Welcome to HQ
Tap your name in the top right to get started.
Tuesday, learn it.
Wednesday, do it.
HQ Service Foundations
Tailored Haircut + Waxing
Enhancements & Add-Ons
Scalp Renewal + Facial Services
Your Technical Training Path
Haircut Design + Service Selection
Learn
Courses and training
Reference
Guides and policies
Progress
My checklist
More
Directory and info
Learn
Your onboarding curriculum.
HQ Service Foundations
Learn the foundations of the HQ guest experience and prepare for hands-on Tailored Haircut and Waxing training.
Become an HQ Employee
Operational onboarding with Shelby before technical learning begins.
Welcome to HQ
Complete HQ onboarding and the Aveda New Hire On Boarding course to understand who we are, why HQ chose Aveda, and the products and values behind the partnership.
Your Six-Week Roadmap
See how Tuesday learning prepares you for Wednesday technical training and what each week will cover.
HQ Communication & Accounts
Set up required communication, payroll, and education accounts.
Boulevard Professional App
Sign in, learn how to clock in and out, and watch only the Professional App Overview on the first Tuesday.
Assigned Policies & Procedures
Complete all four policy phases on your first day and initial each policy to confirm that you have read and understood it.
Learn & Prepare
Complete these items before Wednesday technical training.
Tailored Haircut Service Guide
Study both relaxation paths, product boundaries, and service flow.
Waxing Service Standards
Review the existing waxing descriptions and standards before practice.
Consultation & Guest Experience
Learn the consistent consultation steps and the first, second, and third impressions that shape every HQ service.
Week 1 Knowledge Check
Check understanding of service flow, sanitation, product selection, and guest experience.
Practice & Demonstrate
Angie teaches, coaches, and records technical competency.
Tailored Haircut Demonstration & Practice
Waxing Demonstration & Practice
Technical Skill Verifications
Tailored Haircut and Waxing competency are verified separately after demonstration.
Coming Next
Enhancements & Add-Ons
Build the product knowledge, preparation habits, and service understanding needed for Scalp Renewal and facial-service training.
Learn the Products & Services
Complete these items before Wednesday technical training.
Week 2 Overview
See how this week's learning prepares you for hands-on Scalp Renewal and facial training.
Neill: Scalp Essentials
Complete the assigned Scalp Essentials course on Neill University.
Scalp Solutions at HQ
Review key product knowledge and see exactly how each product is used during HQ's Scalp Renewal Treatment.
Neill: Scalp Renewal Treatment
Complete the Scalp Solutions professional service and products course.
Scalp Renewal Service Guide
Review consultation, product order, application, massage, and service reset.
Neill: Skincare Product Knowledge
Complete the assigned Aveda skincare course on Neill University.
HQ Facial Product Knowledge Recap
Review essential product knowledge, then connect each cleanser, exfoliant, masque, treatment, and finishing product to HQ services.
Facial Safety & Service Readiness
Prepare before seating the guest, recognize when to modify or decline service, and reset correctly.
Express Facial Service Guide
Review the complete Express Facial sequence, product choices, and finish.
Mini Cooling Facial Service Guide
Review chilled-towel preparation, rollers, massage, cooling breath, and reset.
Week 2 Knowledge Check
Check your understanding of products, service selection, sanitation, and service flow.
Practice & Demonstrate
Angi demonstrates, coaches, and records each technical outcome separately.
Scalp Renewal Demonstration & Practice
Express Facial Demonstration & Practice
Mini Cooling Facial Demonstration & Practice
Week 2 Technical Skill Verifications
Scalp Renewal, Express Facial, and Mini Cooling Facial competency are recorded separately.
Prepare Your Week 3 Training Path
Share your priorities early enough for Angi to review them and adjust your Week 3 learning objectives.
Personal Training Priorities
Identify one challenge, one comfortable skill to refine, and one area of curiosity.
Week 3 Training Path Assignment
Angi reviews the survey and two weeks of observation, adjusts learning objectives, and assigns the trainee's path by Saturday.
Coming Next
Your Technical Training Path
Your first two weeks of learning and floor observation now shape a training plan built around what you need next—not how long you have been behind the chair.
Understand Your Path & Prepare
Complete the shared foundation, then focus your preparation around the path Angi assigns.
How Week 3 Works
Understand the three technical paths and how your feedback works together with Angi's observations.
Training Path Assignment
Angi combines two weeks of observation with your priorities to select Technical Foundations, Skill Refinement, or Advanced Exploration.
Men's Haircut Design Foundations
Connect head shape, sectioning, tension, elevation, over-direction, tools, body position, weight, and cross-checking.
Aveda Styling Product Education
Learn what each of HQ's primary styling products does, which hair and finishes it supports, and how to apply it.
Choose the Correct Haircut Service
Distinguish Classic, Tailored, Fade, Little Gents Haircut, and Little Gents Fade using length, complexity, experience, and allotted time.
Four Haircut Learning Guide
Prepare for the Long Shag, Classic Scissor Cut, Short Clipper Cut, and Fade using one consistent design process.
Styling & Product Decisions
Apply your product education by choosing the best product for the haircut, hair characteristics, guest routine, and desired finish.
Week 3 Knowledge Check
Check your understanding of haircut design, correct service selection, product decisions, and the Week 3 training process.
Wednesday Personal Practice Plan
Review your assigned focus, coaching targets, and the skills Angi will observe.
Demonstrate, Practice & Refine
Angi demonstrates the assigned focus, coaches practice, and records individual skill outcomes.
Assigned Haircut Demonstration
The demonstration and level of detail reflect the trainee's assigned path.
Coached Practice
Practice the selected haircut and personal coaching targets on a mannequin or model.
Individual Skill Outcomes
Sectioning, control, tension, elevation, shape, blending, texturizing, finish, timing, and product rationale are recorded separately.
Coming Next
How the Six Weeks Work
Each Tuesday gives you the information and preparation you need for Wednesday's hands-on technical training. The rest of the week reinforces what you learned through practice, coaching, and verification.
- Tuesday: Learn, Review, and Prepare in the Staff Hub.
- Wednesday: Watch the Demonstration, Practice, and Receive Coaching.
- After Training: Complete Any Remaining Practice or Verification.
- Completion: Learning Completion, Knowledge Verification, and Technical Competency Are Tracked Separately.
Your Six Weeks
Boulevard Professional App
For today, focus only on signing in and learning the Professional App. The rest of the Boulevard training library will be assigned later when it supports the work you are learning.
Watch Professional App OverviewHQ Communication & Accounts
Set up each account and confirm that you can sign in before moving on.
- Google Chat: Join the required HQ spaces and review where announcements, salon forms, and team communication live.
- QuickBooks Workforce: Activate your payroll account and confirm access.
- Boulevard Professional: Sign in, confirm your schedule is visible, and make sure you know how to clock in and clock out.
- Aveda PurePro: Activate your professional education account.
- Neill University: Register for education access.
Shelby verifies: Access is working and the required spaces/accounts are complete.
Consultation & Guest Experience
A quality consultation and memorable guest experience should remain consistent across every service at HQ.
- The Welcome: Create a warm first impression. Be ready, stand, smile, greet the guest by name, introduce yourself confidently, and help them feel comfortable from the moment they arrive.
- The Service: Begin with a thoughtful consultation. Ask open-ended questions, listen carefully, assess what is relevant to the service, clarify expectations, explain your recommendation, and agree on the plan before beginning. Keep the guest informed, comfortable, and included throughout the experience.
- The Finish: Create a strong final impression. Review the result, provide useful home-care and maintenance guidance, recommend appropriate products, discuss the next visit, thank the guest by name, and personally escort them to the front desk.
How Week 2 Works
Tuesday connects Aveda education to the exact services performed at HQ. Wednesday, Angi demonstrates the services, coaches your practice, and records each technical outcome separately.
- Scalp Renewal: Learn the complete treatment—not the mini Scalp Revival used in the Tailored Haircut.
- Facial Services: Learn the Express Facial and Mini Cooling Facial products, preparation, safety, and service flow.
- Neill University: Complete all three assigned courses, then return here to confirm completion.
- Knowledge Check: Complete all ten learning items to unlock the quiz. An 80% score is required to pass.
Scalp Essentials
Sign in to Neill University. If this course is not already on your student dashboard, add it to your learning first. Complete the Scalp Essentials course, then return here and confirm completion.
Open Scalp Essentials on NeillScalp Renewal 15-Minute Treatment
Sign in to Neill University. If this course is not already on your student dashboard, add it to your learning first. Complete the professional Scalp Renewal service and products course, then return here and confirm completion.
Open Scalp Renewal on NeillSkincare Product Knowledge
Sign in to Neill University. If this course is not already on your student dashboard, add it to your learning first. Complete the Aveda skincare course, then return here and confirm completion.
Open Skincare Product Knowledge on NeillScalp Solutions at HQ
Circle back to the product knowledge from Neill University, then connect each product to how it is used during HQ's Scalp Renewal Treatment. This is different from the Tailored Haircut's mini Scalp Revival, which uses only the appropriate serum.
- Stimulating Scalp Massager: Prepares the scalp before the shampoo-bowl portion of the service. Use gentle circular motions and work systematically across the scalp.
- Exfoliating Scalp Treatment: Apply through clean partings without touching the nozzle to the scalp. Distribute, dampen, and lather before shampooing; do not rinse it out first.
- Scalp Solutions Balancing Shampoo: Cleanses after the exfoliating treatment has been distributed and lathered.
- Scalp Solutions Hydrating Scalp & Hair Masque: Hydrates a normal-to-dry, stressed scalp and helps reduce flaking caused by dryness. At HQ, apply it to the scalp.
- Scalp Solutions Conditioner: Apply to the remaining hair when it is long enough to permit. Many HQ guests have short hair, so use it only where there are mids and ends to condition.
- Hydrating Scalp Serum: Select for a normal-to-dry scalp.
- Purifying Scalp Serum: Select for a normal-to-oily scalp.
HQ Facial Product Knowledge Recap
Circle back to the product knowledge from Neill University, then connect each product to how it is selected and used in HQ facial services.
- Professional Light Composition Oil: Used to cleanse during the Mini Cooling Facial and to finish the neck ritual. It provides nourishment and lasting slip.
- Purifying Gel Cleanser: Gel cleanser selected at HQ for normal-to-oily or combination skin.
- Professional Balancing Cleanser: Gentle cream cleanser that removes impurities and environmental pollutants while helping maintain the skin's moisture barrier. Aveda identifies it as suitable for all skin types, including sensitive and acneic skin; at HQ it is selected for normal-to-dry skin.
- Botanical Kinetics Exfoliating Exfoliant: Gentle, non-abrasive liquid exfoliant. Apply with cotton rounds using upward and outward movements; it is the better selection for more sensitive skin.
- Botanical Kinetics Radiant Skin Refiner: More abrasive exfoliant that may be used on all skin types when that level of exfoliation is appropriate. Apply with wet hands using upward movements.
- Intense Hydrating Masque: Oil-free gel masque that provides cool, soothing relief from dryness. Plant-derived glycerin, sodium hyaluronate, and betaine help hydrate while rosewater helps tone and refresh. Apply with a clean masque brush and avoid the eye area.
- Hydrating Treatment Lotion: Apply using gentle upward movements after masque removal.
- Energizing Eye Creme: Apply gently over the orbital bone with ring fingers, moving from the inner corners outward and avoiding direct eye contact.
- Botanical Kinetics Hydrating Lotion: Quick-absorbing moisturizer suitable for all skin types; used in both facial services.
- Cooling Balancing Oil Concentrate: Provides cooling refreshment. Use 2–3 drops for the Mini Cooling Facial breathing ritual and avoid contact with the eyes.
Facial Safety & Service Readiness
Before the Guest Is Seated
Review the booked add-on and gather every product, tool, towel, bowl, brush, cotton round, facial roller, or scalp brush needed from the backbar shelf. Bring everything to the station and complete the setup before seating the guest so the experience remains seamless.
Observe and Adjust
- Do not perform a facial service when the guest has active irritation, broken skin, or signs of infection.
- A guest with mild inflammation or redness may receive the facial, but skip the exfoliation step.
- Explain any service adjustment to the guest before proceeding.
After Every Service
- Facial rollers and scalp brushes: Place in the designated Barbicide jar at the back sink for at least 10 minutes. Move them to the drying rack. Once completely dry, return facial rollers to the freezer and scalp brushes to their spot on the backbar shelf.
- Facial masque brushes: Wash at the back sink with dish soap, rinse thoroughly, and leave on the drying rack. Once completely dry, return them to the backbar shelf.
- Products: Return all products used during the facial or Scalp Renewal Treatment to the backbar shelf.
- Single-use supplies and towels: Dispose of or place them in the appropriate laundry location, then clean and reset the station.
How Week 3 Works
This week becomes personal. Your path is based on what Angi observed during your first two weeks and what you identify as challenging, worth refining, or exciting to explore.
Technical Foundations
Learn or rebuild the essential mechanics that make haircutting controlled, repeatable, and accurate.
Skill Refinement
Strengthen precision, consistency, efficiency, and finish in techniques you already understand.
Advanced Exploration
Develop advanced techniques or services that are new to you while sharpening an individual goal.
Help Shape Your Week 3 Training
Complete this before Angi's Saturday review. Your answers give you a voice in the plan and help Angi adjust your Week 3 learning objectives, but they do not automatically determine your path.
Training Path Assignment
Angi considers two weeks of guest-floor observation, your self-assessment, and the mechanics demonstrated in your work.
Build the Mechanics
Sectioning, hand placement, visible guides, tension, basic elevation, clipper control, blending, and repeatable practice.
Improve the Execution
Comb and finger elevation, finger tension, controlled over-direction, clipper stroke, weight refinement, cross-checking, and efficiency.
Expand the Skill Set
Advanced texturizing, Aveda color clarification, shaves, perms, body waxing, unfamiliar services, creative variations, or another approved goal.
Your assigned path will appear here
For this framework preview, Angi's assignment and observation rubric will be connected during the Week 3 backend phase.
Men's Haircut Design Foundations
A haircut template is the roadmap. Before cutting, assess the guest and decide where length and weight need to live.
- Analyze first: Texture, density, growth patterns, head shape, lifestyle, maintenance, and desired finish influence the plan.
- Section with purpose: Use clean sections that make the guide and intended shape easy to follow.
- Control weight: Length, elevation, and over-direction determine where weight is built, retained, or removed.
- Maintain tension: Consistent tension supports accuracy. Hand placement, anchor points, and supporting the head improve control.
- Position intentionally: Adjust your body, chair height, and the guest's head rather than reaching or cutting from a distorted angle.
- Use the correct stroke: A short-radius clipper stroke builds weight quickly; a longer-radius stroke creates a more gradual taper.
- Check continuously: Comb the hair into its natural fall, cross-check balance, feel for excess weight, and look from more than one angle.
Choose the Correct Haircut Service
Using clippers does not make a haircut a fade. Correct service selection depends on the shortest length, the blending architecture, the service experience, and the time required.
| Service | Time | Use When |
|---|---|---|
| The Classic | 30 min | A standard haircut without intricate fade work. |
| The Tailored | 45 min | A standard haircut plus the guest's booked Tension Release or Scalp Revival relaxation experience. |
| The Fade | 45 min | Very short starting areas—generally below a #1—must transition through several lengths with detailed line removal and intricate blending. |
| Little Gents Haircut | 30 min | A youth haircut without true fade architecture. |
| Little Gents Fade | 30 min | A youth haircut requiring the same progressive, intricate blending that defines an adult fade. |
Apply the rule
A #3 guard is taken uniformly up the sides. Clippers were used, but there is no intricate transition.
A #1 guard is taken uniformly up the sides. The short length alone does not create a fade.
A #1 at the nape and temples transitions through several lengths into approximately #3–#4 at the parietal ridge, requiring detailed line removal.
Skin or zero at the perimeter transitions progressively into longer lengths through controlled, intricate blending.
One Design Process, Four Shapes
Open each guide before Wednesday practice. The progression moves from the longest mannequin result to the shortest so each cut preserves enough hair for the next assignment.
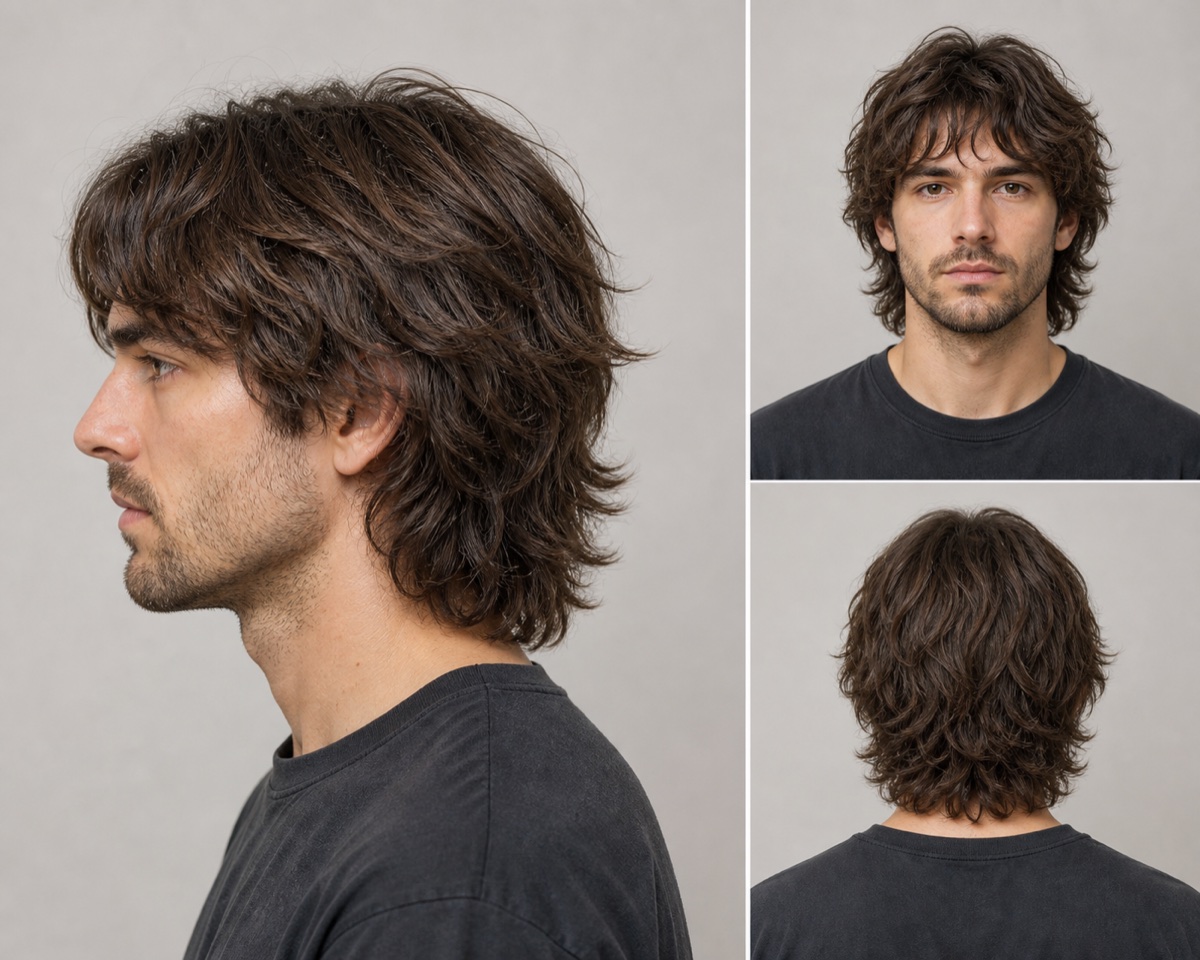
1. Long Scissor Cut / Men's Shag
Long- Preserve intentional length while building movement.
- Focus on sectioning, elevation, over-direction, layering, weight distribution, texturizing, and styling.
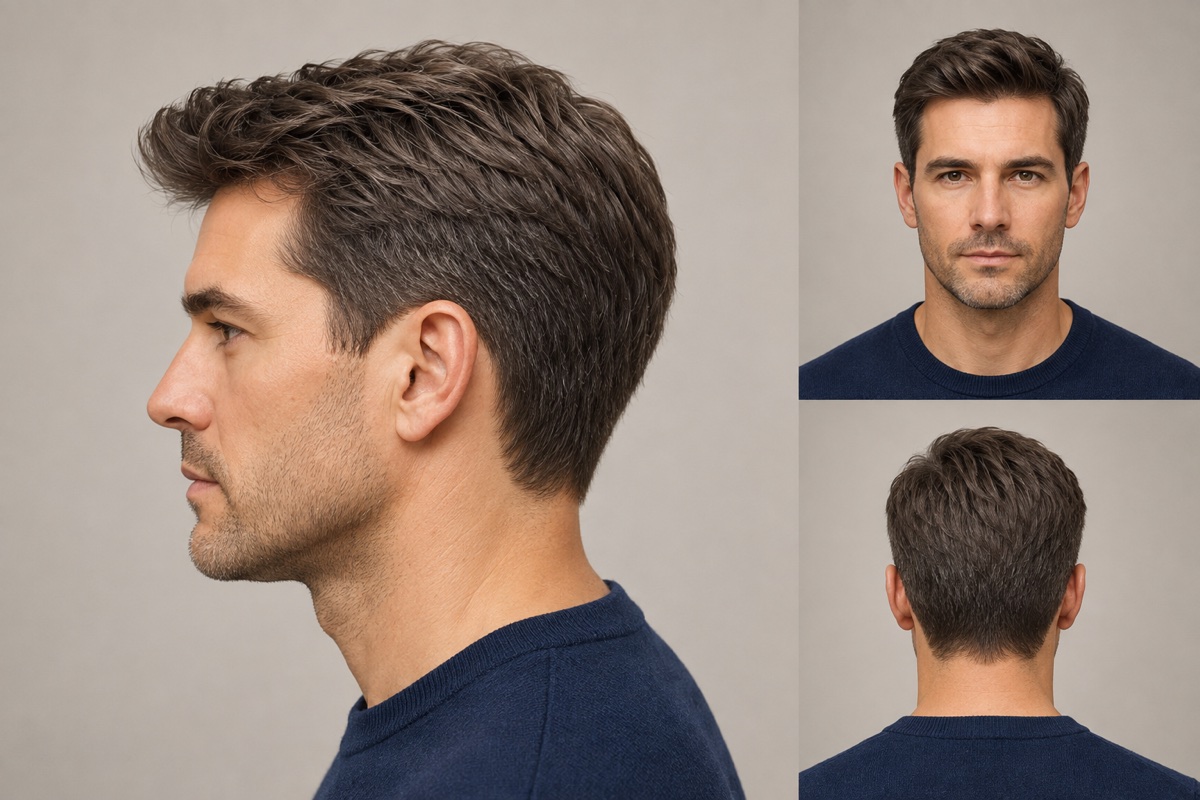
2. Classic Scissor Cut
#3–#5 Equivalent- Create a classic shorter shape primarily through scissor work.
- Focus on finger tension, graduation, scissor-over-comb, connection, and balance.
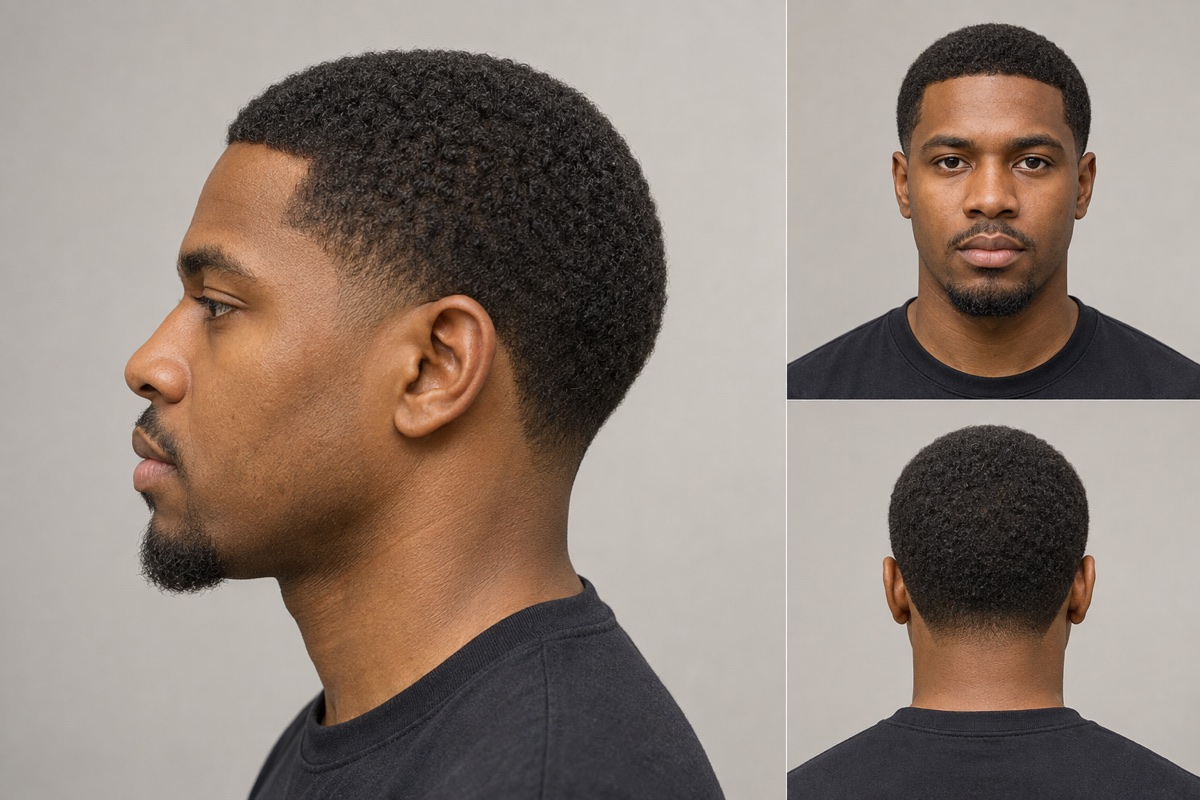
3. Short Clipper Cut
#1–#2.5- Build consistent length and a clean connection without assuming the service is a fade.
- Focus on clipper control, guard selection, stroke direction, tapering, and connection.
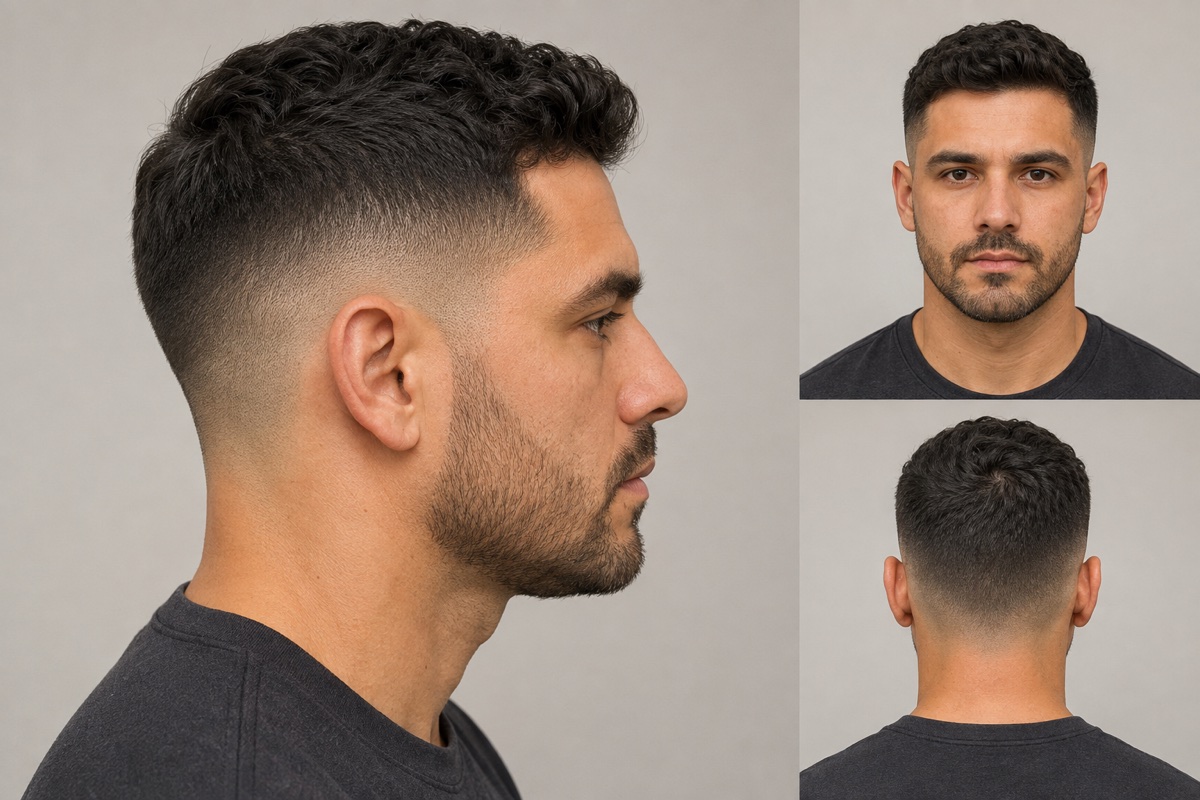
4. Fade
Under #1 + Transition- Create a deliberate transition from very short areas into longer lengths.
- Focus on guideline placement, guard progression, line removal, parietal connection, and efficiency.
Long Scissor Cut / Men's Shag
Design Goal
Create a relaxed, wearable shape with intentional length, movement, and balanced weight. The perimeter and internal layers should work together without making the ends look thin.
Assess Before Cutting
- Identify texture, density, growth patterns, natural part, recession, head shape, current layers, and the guest's styling routine.
- Agree on the shortest acceptable areas, the amount of movement desired, and where the guest wants fullness retained.
- Choose a plan for the fringe, crown, perimeter, and connection around the ears before removing length.
Cutting Roadmap
- Establish clean working sections and a visible guide. Use subsections small enough to see and control that guide.
- Set the perimeter and longest points first. Preserve the length needed for the intended silhouette.
- Build internal movement with controlled elevation. Use over-direction intentionally to preserve length or weight.
- Connect the sides, top, and back without automatically removing every area of weight; intentional disconnection may be appropriate when it supports the design.
- Refine around the face, ears, crown, and perimeter after checking natural fall.
Technique Decisions
- Elevation: Lower elevation retains more weight; higher elevation removes more weight and increases movement.
- Tension: Keep tension consistent and reduce tension around strong growth patterns or areas that will spring when dry.
- Texturizing: Personalize only after the shape is established. Avoid thinning already-fine ends or creating holes in dense sections.
Common Problems to Watch
- Removing too much perimeter weight; losing length through over-direction; inconsistent layers; over-texturizing; cutting the crown without respecting growth.
Style and Check
Choose a finish that supports movement and the guest's routine. Light Elements Texturizing Creme, Texture Tonic, Grooming Cream, or a light layer of Defining Whip may support different versions of this result.
Classic Scissor Cut
Design Goal
Create a controlled, balanced shape comparable to a #3–#5 length while using scissor work to customize weight, contour, and movement.
Assess Before Cutting
- Determine whether the desired contour is square, round, or leaner through the sides and how the profile should balance the guest's features.
- Identify the parietal ridge, occipital, crown, recession, ears, neckline, density changes, and growth patterns.
- Decide whether the connection will be fully blended or intentionally retain weight.
Cutting Roadmap
- Section the top from the lower zones and establish a dependable guide panel.
- Build the lower shape with conventional sections, scissor-over-comb, or a combination appropriate to the length and texture.
- Control graduation through consistent comb angle, finger angle, tension, and body position.
- Establish the top length and connect it through the transition without rounding a shape intended to remain square.
- Refine the outline and neckline, then cross-check at 90 degrees to the original cutting sections.
Technique Decisions
- Scissor-over-comb: The comb determines the length and contour. Keep the comb moving consistently and avoid chasing isolated dark areas too early.
- Weight: Check the widest areas of the head before removing bulk; a flat occipital may need retained weight, while a pronounced occipital may need weight redistributed.
- Cross-check: Comb into natural fall, compare front and profile contours, and check balance from more than one angle.
Common Problems to Watch
- Rounding the corners unintentionally; losing the guide; uneven tension; cutting from a stretched body position; over-removing weight at the parietal ridge.
Style and Check
Grooming Cream supports touchable control, Liquid Pomade or Pure-Formance Pomade supports polished definition, and Grooming Clay supports a more matte textured result.
Short Clipper Cut
Design Goal
Create a clean short cut in the #1–#2.5 range with consistent length, controlled tapering, and a deliberate connection to the top. Using clippers does not automatically make this service a fade.
Assess Before Cutting
- Confirm the shortest length, desired outline, amount of scalp exposure, top length, connection, and maintenance schedule.
- Check growth direction, cowlicks, density, scalp condition, head-shape changes, and previous clipper lines.
Cutting Roadmap
- Stage guards, clippers, trimmer, combs, scissors, and finishing tools before beginning.
- Remove bulk methodically. Work against growth when at-tolerance cutting is needed and maintain even contact.
- Use a controlled pivot or fanning motion to taper and build graduation without creating a hard line.
- Connect the lower zones to the top with clipper-over-comb, scissor-over-comb, or controlled guard work.
- Refine the outline only after the internal shape and balance are established.
Technique Decisions
- Stroke radius: A short, abrupt stroke builds weight quickly; a longer outward stroke creates a softer transition.
- Raking and tension: Direct hair consistently so the clipper can cut evenly, particularly through changing growth patterns.
- Service classification: A uniform #1 or #2.5 and a simple taper are not automatically fades. Classification depends on the complete design and blending complexity.
Common Problems to Watch
- Uneven pressure; missed growth directions; a heavy shelf at the parietal ridge; chasing shadows without recombing; outlining too early or too aggressively.
Style and Check
Choose Grooming Clay for matte texture, Grooming Cream for natural control, Pomade for polished definition, or Firm Hold Gel when maximum structure and shine are requested.
Fade
Design Goal
Create a clean progression from very short areas—generally below a #1—into longer lengths through precise guideline placement and intricate blending. The transition, not the mere use of clippers, defines the service.
Assess Before Cutting
- Confirm the lowest length, fade height, desired weight through the parietal ridge, top connection, outline, and maintenance expectations.
- Identify dents, ridges, flat areas, pronounced occipital shape, density changes, growth direction, scalp visibility, and previous lines.
Cutting Roadmap
- Set the first guideline deliberately and keep its height balanced around the head.
- Create enough working space for each transition. Avoid stacking guidelines so closely that there is no room to blend.
- Progress through the necessary blade, lever, or guard lengths in a consistent order.
- Remove each visible line with the smallest effective adjustment, controlled corner work, and an appropriate stroke radius.
- Connect into the longer area without driving the fade higher than the agreed design.
- Refine only after stepping back, recombing, and checking the head from front, profile, and back.
Technique Decisions
- Short areas: Work with controlled pressure and respect scalp sensitivity and irregular head shape.
- Line removal: Use corners and small adjustments rather than widening the shortest band unnecessarily.
- Weight: Decide whether weight should remain at the ridge or be softened; do not remove it simply because it appears darker at close range.
Common Problems to Watch
- Guidelines placed too high; insufficient space between transitions; skipping lengths; creating new lines while removing old ones; chasing shadows caused by density or head shape; an uneven fade height.
Style and Check
Match the top finish to the agreed result. Grooming Clay supports matte separation, Pomade supports high-shine control, Liquid Pomade supports movement and shine, and Firm Hold Gel supports maximum structure.
Choose the Finish, Then the Product
Connect the product decision to the haircut, hair condition, guest routine, and desired result.
- Hold: How much structure must the product provide?
- Finish: Should the hair look matte, natural, textured, smooth, or polished?
- Control: Does the hair need flexibility, separation, definition, frizz control, or stronger placement?
- Hair characteristics: Consider length, density, texture, condition, and natural movement.
- Application: Decide how much to use, whether hair should be damp or dry, where to begin, and how to distribute it evenly.
- Home use: Recommend only what the guest can realistically recreate.
Choose the Finish activity
Apply the decision process to realistic haircut and styling outcomes. Answer every scenario, then review why each selection does or does not support the desired finish.
Your Personal Practice Plan
Before hands-on training, you should know what you are practicing, why it was selected, and what successful progress will look like.
- Assigned path: Technical Foundations, Skill Refinement, or Advanced Exploration
- Assigned haircut or service focus
- Your challenge: The area needing direct support
- Your refinement goal: The comfortable skill you want to polish
- Your curiosity goal: The area you want to explore
- Angi's coaching targets: The specific mechanics she will demonstrate and observe
- Practice format: Mannequin, model, demonstration, or another approved activity
Skills are verified separately
Each assigned coaching target can be marked Not Started, Needs Coaching, Developing, or Verified. Assigned work that is not completed on Wednesday of Week 3 is carried into Wednesday of Week 5.
Your assigned Week 3 plan
Your published plan, current skill outcomes, and any Week 5 follow-up will appear here.
Aveda Styling Products at HQ
Start with the result the guest wants, then consider hair length, texture, density, condition, routine, hold, and finish. Use the smallest effective amount and add more only when needed.
The HQ Service Providers Onboarding
What it looks like to be an HQ Stylist
Aveda New Hire On Boarding
Meet Aveda through its mission, story, core values, product categories, artistry, hair color, and Salon Service Wheel. This course provides the Aveda overview that complements HQ's culture-focused presentation.
Open Aveda New Hire On Boarding on NeillContinuing Education
Add CE courses to your Google Sheet and they will appear here.
Product Launches
New product education will appear here as it is added to your sheet.
Front Desk Education
Front desk training modules will appear here once added to your sheet.
NeillU Aveda PK
NeillU courses will appear here once added to your sheet.
Reference
Quick lookups for everyone, anytime.
Choosing the Right Wax
Deluxe Crème Wax
Soft pink wax for brows, lip, chin, shoulders, arms, back, and legs. It is the most abrasive option and should not be used on sensitive skin.
Use with stripsIntimate Hard Wax
Light blue hard wax for brows, ears, beard, intimate areas, and sensitive skin. It grips the skin less and is gentler than the dark blue hard wax.
No stripsBlue Hard Wax
Hard wax that may be used anywhere on the body and is especially useful for ears, nose, and beard waxing.
No stripsWaxing Sanitation Standards
Need the complete policy document? Open the full HQ Employee Handbook for full policy language, forms, and details.
Final Handbook Acknowledgement — Assigned Later
This is separate from the four first-day policy phases. Your final full-handbook review and acknowledgement will be assigned on a later day.
Progress
Track your training completion.
More
Team directory and app info.
Signed in as — (—)
HQ Staff Hub is maintained by the HQ management team. Use this app to complete onboarding, access education, review policies, and reference service standards.
Version 2.0 — HQ Staff Hub